Deployment to a Databricks cluster
This tutorial uses the PySpark Iris Kedro Starter to illustrate how to bootstrap a Kedro project using Spark and deploy it to a Databricks cluster on AWS. It is split into 2 sections:
Databricks Connect workflow (recommended)
Databricks Notebook workflow (the setup of this is more involved)
Prerequisites
Both section have the following prerequisites:
New or existing AWS account with administrative privileges
Active Databricks deployment on AWS (Databricks Community Edition won’t suffice as it doesn’t allow you to provision personal tokens)
Conda installed on your local machine
Run the Kedro project with Databricks Connect
In this section, we show how to create a sample Iris project with PySpark, connect it to the Databricks cluster using Databricks Connect, and trigger a run from the local machine.
Note
The additional requirement in this section is to have Java 8 installed on your local machine (as Databricks Connect does not support Java 11).
1. Project setup
First, let’s create a new virtual environment and, within it, a new Kedro project:
# create fresh virtual env
# NOTE: minor Python version of the environment
# must match the version on the Databricks cluster
conda create --name iris_databricks python=3.7 -y
conda activate iris_databricks

# install Kedro and create a new project
pip install "kedro~=0.17.7"
# name your project Iris Databricks when prompted for it
kedro new --starter pyspark-iris
2. Install dependencies and run locally
Now, as the project has been successfully created, we should move into the project root directory, install project dependencies, and then start a local test run using Spark local execution mode, which means that all Spark jobs will be executed in a single JVM locally, rather than in a cluster. pyspark-iris Kedro starter used to generate the project already has all necessary configuration for it to work, you just need to have pyspark Python package installed, which is done for you by kedro install command below.
# change the directory to the project root
cd iris-databricks/
# compile and install the project dependencies, this may take a few minutes
kedro install
# start a local run
kedro run
You should get a similar output:
...
2020-09-09 18:57:36,762 - iris_databricks.pipelines.data_science.nodes - INFO - Model accuracy: 100.00%
2020-09-09 18:57:36,762 - kedro.runner.sequential_runner - INFO - Completed 5 out of 5 tasks
2020-09-09 18:57:36,762 - kedro.runner.sequential_runner - INFO - Pipeline execution completed successfully.
3. Create a Databricks cluster
If you already have an active cluster with runtime version 7.1, you can skip this step. Here is how to find clusters in your Databricks workspace.
Follow the Databricks official guide to create a new cluster. For the purpose of this tutorial (and to minimise costs) we recommend the following settings:
Runtime:
7.1 (Scala 2.12, Spark 3.0.0)Enable autoscaling:
offTerminate after 120 minutes of inactivity:
onWorker type:
m4.largeDriver Type:
Same as workerWorkers:
2Advanced options -> Instances -> # Volumes:
1
While your cluster is being provisioned, you can continue to the next step.
4. Install Databricks Connect
Databricks Connect is a Python library that you must install within your local environment:
# first, we need to uninstall pyspark package
# as Databricks Connect comes with its own implementation of it
pip uninstall -y pyspark

# install the version equal to the cluster environment
pip install "databricks-connect==7.1"
5. Configure Databricks Connect
You can create the personal access token needed by Databricks Connect by following the official documentation.
Note
Databricks Community Edition does not allow you to provision personal tokens, therefore it won’t work for this.
You also need to retrieve the Databricks workspace URL (the domain you log into when accessing your deployment), and the Cluster ID, which you connect to.
Now, as you have all the necessary credentials, configure databricks-connect. To do so, run the CLI command and follow the prompts:
databricks-connect configure
Alternatively, you can configure Databricks Connect by setting the environment variables as follows:
export DATABRICKS_ADDRESS=https://dbc-XXXXXXXX-XXXX.cloud.databricks.com \
    DATABRICKS_API_TOKEN=XXX \
    DATABRICKS_CLUSTER_ID=XXXX-XXXXXX-XXXXXX \
    DATABRICKS_ORG_ID=0 \
    DATABRICKS_PORT=15001
Let’s test the configuration by running from the CLI:
databricks-connect test
6. Copy local data into DBFS
Our Spark jobs will now run on Databricks, so we need to give them access to the relevant input data. Copy your local data/ directory into the Databricks File System (DBFS).
Run python from the CLI to start the interactive session, and then execute the following script:
from pyspark.dbutils import DBUtils
from pyspark.sql import SparkSession

from pathlib import Path

spark = SparkSession.builder.getOrCreate()
dbutils = DBUtils(spark.sparkContext)

data_dir = Path.cwd() / "data"
dbutils.fs.cp(
    f"file://{data_dir.as_posix()}", "dbfs:/iris-databricks/data", recurse=True
)

# make sure DBFS ls returns a similar result
dbutils.fs.ls("dbfs:/iris-databricks/data/01_raw/")
# [FileInfo(path='dbfs:/iris-databricks/data/01_raw/.gitkeep', name='.gitkeep', size=0),
# FileInfo(path='dbfs:/iris-databricks/data/01_raw/iris.csv', name='iris.csv', size=3858)]
Then type exit() to terminate the Python session.
Finally, modify the project catalog so that the example_iris_data dataset points to a new DBFS location instead of local. You can use Kedro configuration environments for this.
Copy the catalog.yml from base into dbfs environment by running the CLI command:
mkdir conf/dbfs
cp conf/base/catalog.yml conf/dbfs/catalog.yml
Then open conf/dbfs/catalog.yml in any text editor and modify the filepath for example_iris_data as follows:
example_iris_data:
  type: spark.SparkDataSet
  filepath: dbfs:/iris-databricks/data/01_raw/iris.csv  # <<< change the filepath to this
  file_format: csv
  load_args:
    header: true
    inferSchema: true
  save_args:
    sep: ","
    header: true
7. Run the project
Configuration is now complete, and you are ready to run your Kedro project on Databricks!
Trigger the run from the CLI locally using the dbfs configuration environment:
kedro run --env dbfs
You will notice that the logs of the run execution differ slightly. You should see similar output:
...
2020-09-09 20:28:16,482 - kedro.io.data_catalog - INFO - Loading data from `example_predictions` (MemoryDataSet)...
2020-09-09 20:28:16,483 - kedro.pipeline.node - INFO - Running node: report_accuracy([example_predictions]) -> None
View job details at https://dbc-XXXXXX-XXXX.cloud.databricks.com/?o=0#/setting/clusters/XXXX-XXXXXX-XXXXXX/sparkUi
2020-09-09 20:28:19,531 - iris_databricks.pipelines.data_science.nodes - INFO - Model accuracy: 97.06%
2020-09-09 20:28:19,533 - kedro.runner.sequential_runner - INFO - Completed 5 out of 5 tasks
2020-09-09 20:28:19,533 - kedro.runner.sequential_runner - INFO - Pipeline execution completed successfully.
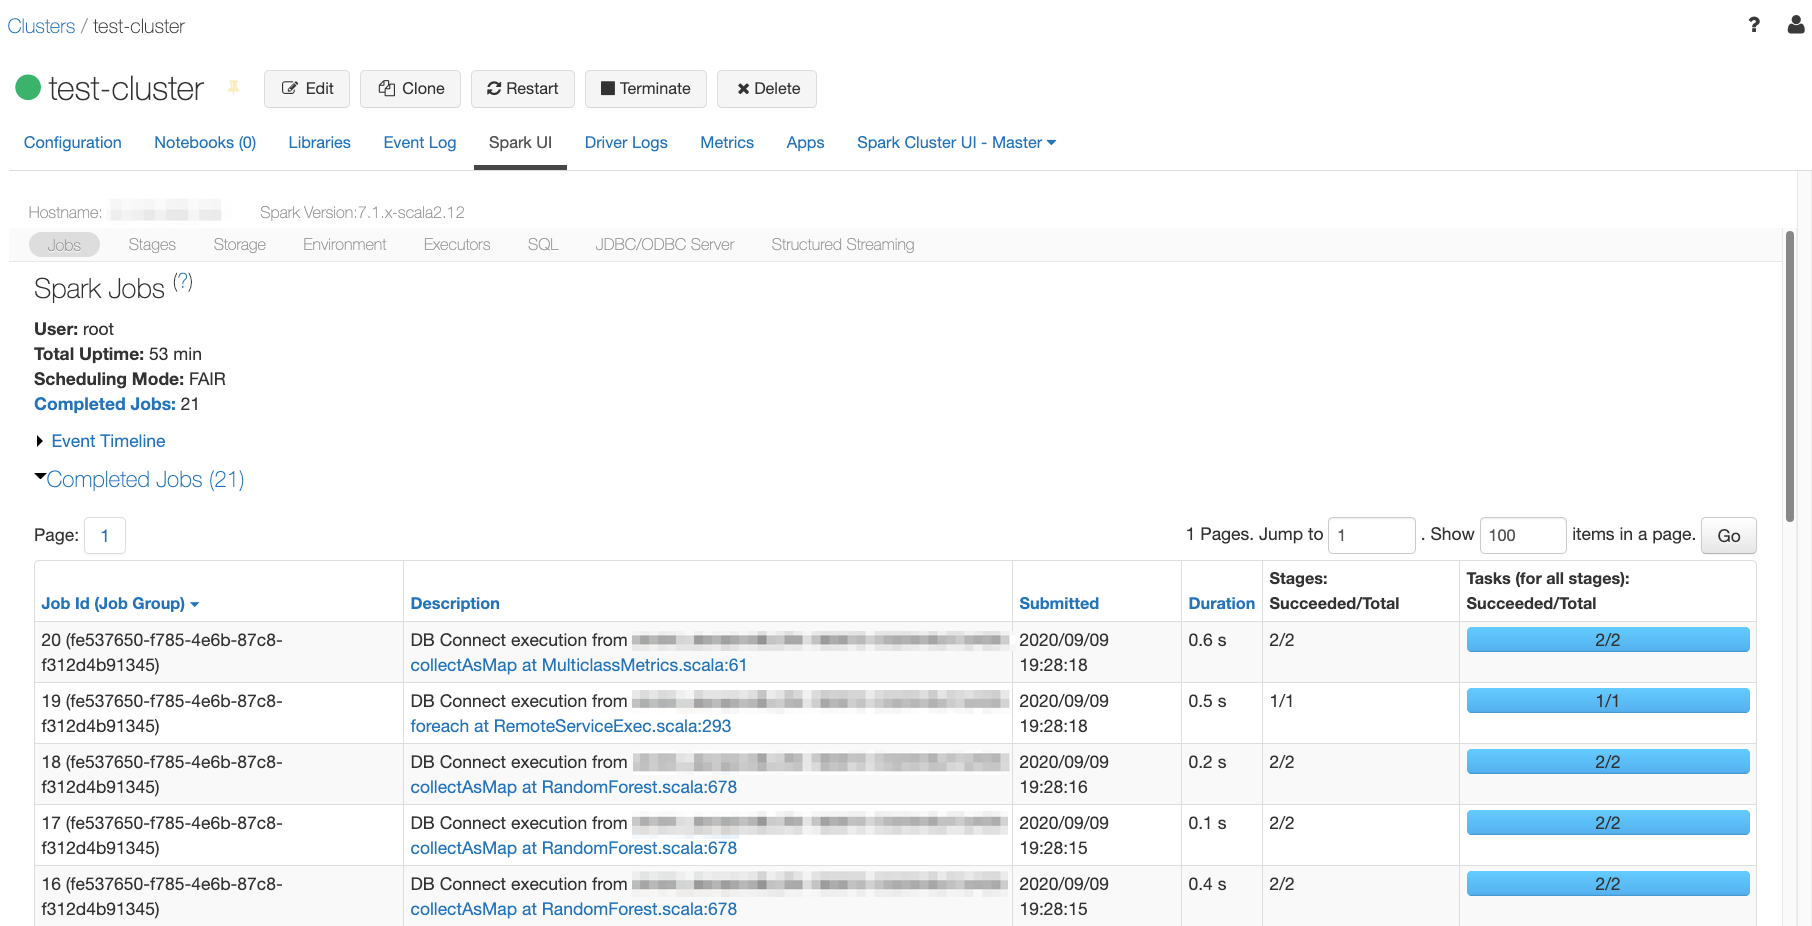
Open the Spark UI tab in your Databricks cluster UI, and you should see a similar list of completed jobs:
Run Kedro project from a Databricks notebook
As noted in this post describing CI/CD automation on Databricks, “Users may find themselves struggling to keep up with the numerous notebooks containing the ETL, data science experimentation, dashboards etc.”
Therefore, we do not recommend that you rely on the notebooks for running and/or deploying your Kedro pipelines unless it is unavoidable. The workflow described in this section may be useful for experimentation and initial data analysis stages, but it is not designed for productionisation.
Extra requirements
In addition to the common prerequisites, to run through this section you would need:
1. Create Kedro project
Firstly, we will need to reproduce the first three steps from the previous section:
As a result you should get:
A Kedro project, which runs with the local version of PySpark library
A running Databricks cluster
2. Create GitHub personal access token
To synchronise the project between the local development environment and Databricks we will use a private GitHub repository that you will create in the next step. For authentication we will need a GitHub personal access token, so go ahead and create such token in your GitHub developer settings.
Note
Make sure that repo scopes are enabled for your token.
3. Create a GitHub repository
Now you should create a new repository in GitHub using the official guide. You can keep the repository private and you don’t need to commit to it just yet.
To connect to the newly created repository you can use one of 2 options:
SSH: If you choose to connect with SSH, you will also need to configure the SSH connection to GitHub, unless you already have an existing SSH key configured for GitHub
HTTPS: If using HTTPS, you will be asked for your GitHub username and password when you push your first commit - please use your GitHub username and your personal access token generated in the previous step as a password and not your original GitHub password.
4. Push Kedro project to the GitHub repository
We will use a CLI to push the newly created Kedro project to GitHub. First, you need to initialise Git in your project root directory:
# change the directory to the project root
cd iris-databricks/
# initialise git
git init
Then, create the first commit:
# add all files to git staging area
git add .
# create the first commit
git commit -m "first commit"
Finally, push the commit to GitHub:
# configure a new remote
# for HTTPS run:
git remote add origin https://github.com/<username>/<repo-name>.git
# or for SSH run:
git remote add origin git@github.com:<username>/<repo-name>.git

# verify the new remote URL
git remote -v

# push the first commit
git push --set-upstream origin main
5. Configure the Databricks cluster
The project has now been pushed to your private GitHub repository, and in order to pull it from the Databricks, we need to configure personal access token you generated in Step 2.
Log into your Databricks workspace and then:
Open
ClusterstabClick on your cluster name
Press
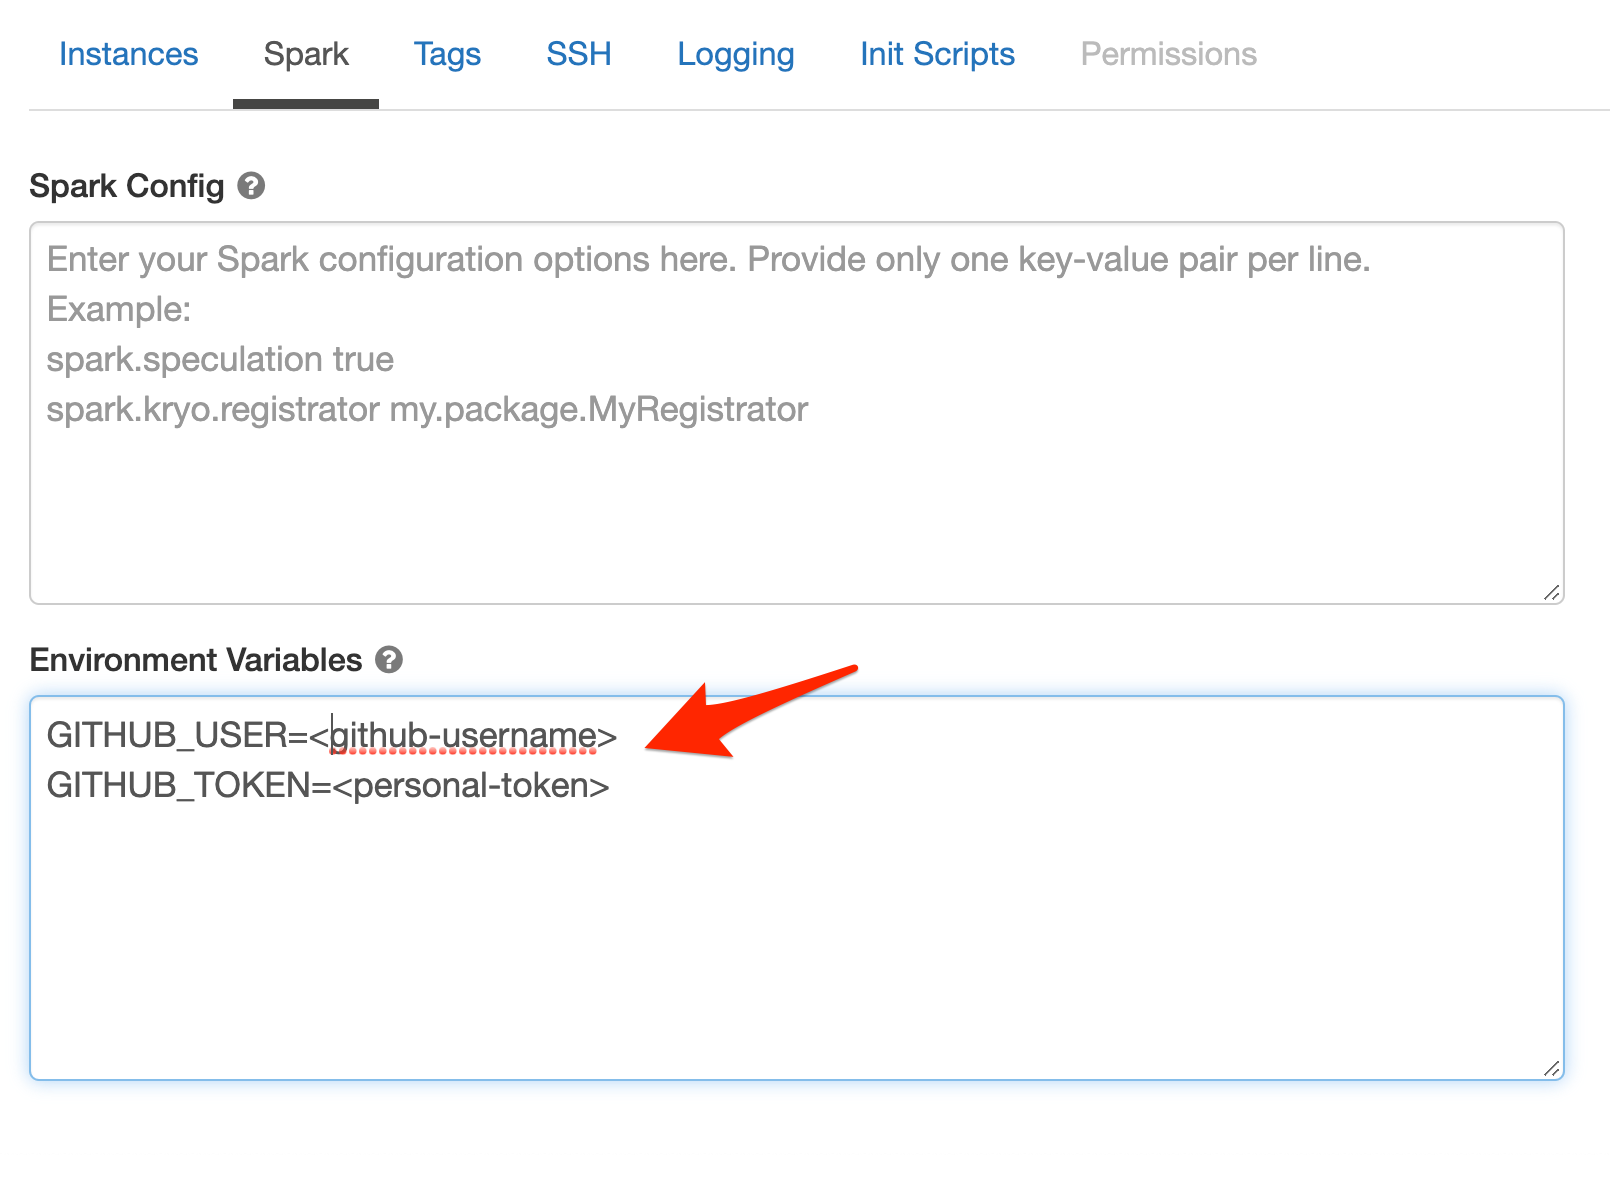
EditGo to the
Advanced Optionsand thenSpark

Then in the Environment Variables section add your GITHUB_USER and GITHUB_TOKEN as shown on the picture:
Note
For security purposes, we strongly recommend against hard-coding any secrets into your notebooks.
Then press Confirm button. Your cluster will be restarted to apply the changes, this will take a few minutes.
6. Run your Kedro project from the Databricks notebook
Congratulations, you are now ready to run your Kedro project from the Databricks!
Create your Databricks notebook and remember to attach it to the cluster you have just configured.
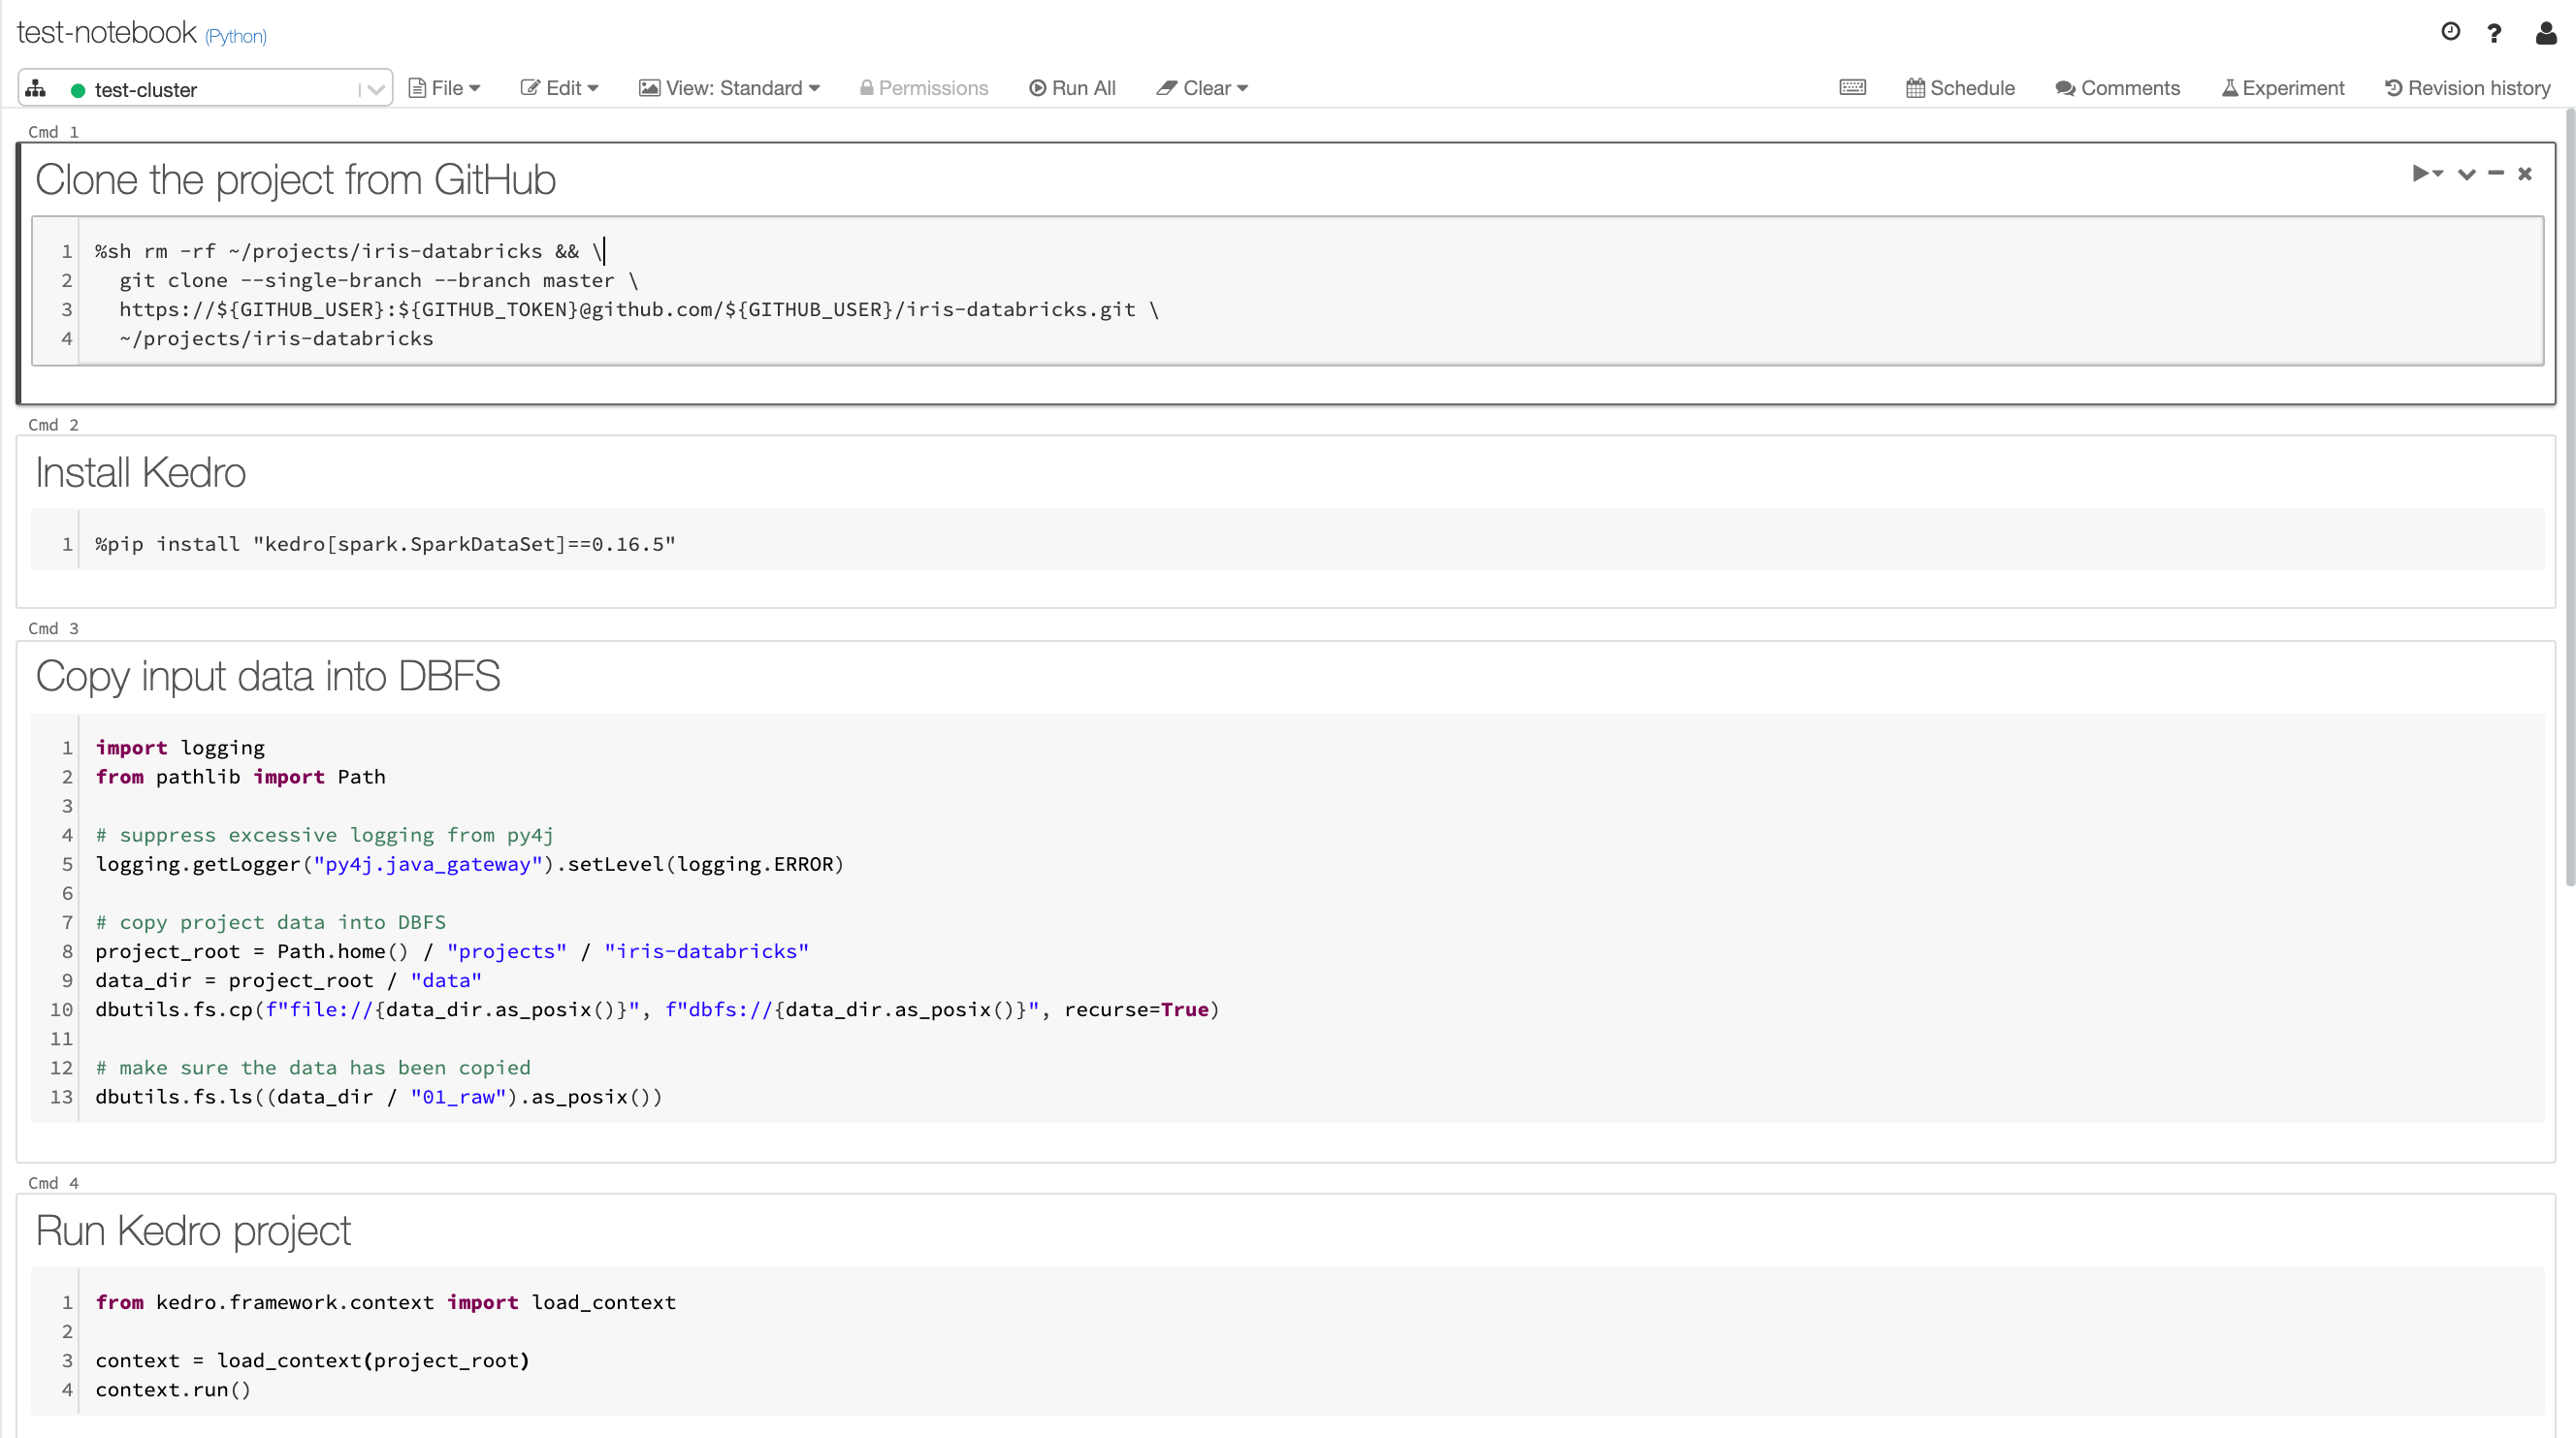
In your newly created notebook put each code snippet from below into a separate cell and then run all cells:
Clone your project from GitHub
%sh rm -rf ~/projects/iris-databricks && git clone --single-branch --branch main https://${GITHUB_USER}:${GITHUB_TOKEN}@github.com/${GITHUB_USER}/<your-repo-name>.git ~/projects/iris-databricks
Install the latest version of Kedro compatible with version
0.17.7
%pip install "kedro[spark.SparkDataSet]~=0.17.7"
Copy input data into DBFS
import logging
from pathlib import Path

# suppress excessive logging from py4j
logging.getLogger("py4j.java_gateway").setLevel(logging.ERROR)

# copy project data into DBFS
project_root = Path.home() / "projects" / "iris-databricks"
data_dir = project_root / "data"
dbutils.fs.cp(
    f"file://{data_dir.as_posix()}", f"dbfs://{data_dir.as_posix()}", recurse=True
)

# make sure the data has been copied
dbutils.fs.ls((data_dir / "01_raw").as_posix())
You should get a similar output:
Out[11]: [FileInfo(path='dbfs:/root/projects/iris-databricks/data/01_raw/.gitkeep', name='.gitkeep', size=0),
 FileInfo(path='dbfs:/root/projects/iris-databricks/data/01_raw/iris.csv', name='iris.csv', size=3858)]
Run Kedro project
from kedro.framework.session import KedroSession
from kedro.framework.startup import bootstrap_project

bootstrap_project(project_root)

with KedroSession.create(project_path=project_root) as session:
    session.run()
You should get a similar output:
...
2020-09-16 10:45:21,991 - kedro.io.data_catalog - INFO - Loading data from `example_predictions` (MemoryDataSet)...
2020-09-16 10:45:21,991 - kedro.pipeline.node - INFO - Running node: report_accuracy([example_predictions]) -> None
2020-09-16 10:45:23,128 - iris_databricks.pipelines.data_science.nodes - INFO - Model accuracy: 97.30%
2020-09-16 10:45:23,144 - kedro.runner.sequential_runner - INFO - Completed 5 out of 5 tasks
2020-09-16 10:45:23,145 - kedro.runner.sequential_runner - INFO - Pipeline execution completed successfully.
Out[12]: {}
Your complete notebook should look similar to this (the results are hidden):